
John Ringold e-mailed me asking how to enlarge part of an image that is encircled within an oval.
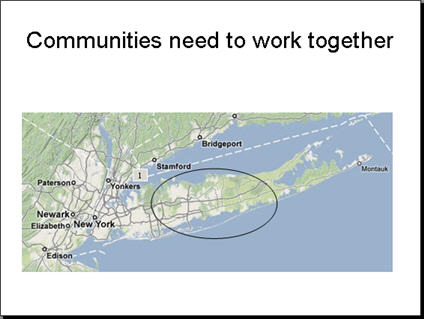
Here's a slide with a map on Long Island. The idea is to magnify the section inside the oval.
I came up with two techniques.
Contest! If you can come up with another technique, send it to me. The first person to send in one that I think does the job will receive a free copy of 101 Tips Every PowerPoint User Should Know or 7 Steps to Great Images — your choice. The deadline is Wednesday, September 17th.
Use the Grow/Shrink animation on an image-filled AutoShape
The first method is easy, but the resulting image is a little fuzzy. Follow these steps:
Insert your main image.
Select the image and duplicate it (Ctrl+D).
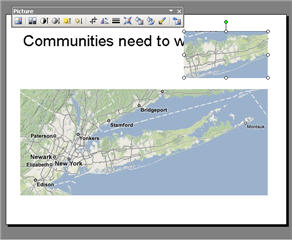
Display the Picture toolbar (right-click any toolbar and choose Picture). Choose the Crop button. (In 2007, click the Picture Tools Format tab and click the Crop button.) Crop the picture to the area that you want to show enlarged. Here you see the cropped picture in the upper-right corner of the slide.
Right-click the picture and choose Save as Picture.
Delete the cropped picture; you don't need it on the slide any more.
Insert an Oval from the Draw toolbar, dragging it to cover the area that you want to enlarge. (In 2007, insert it from the Home tab> Drawing group, Shapes.) Resize and move it as desired.
Right-click the oval and choose Format AutoShape (in 2007: Format Shape). On the Colors and Lines tab, click the Fill Color drop-down list and choose Fill Effects, then click the Picture tab. Click Select Picture and choose the image you saved. Click Insert. (In 2007, in the Fill category, choose Picture or Texture Fill. Click the File button, choose the image you saved, and click Insert.)
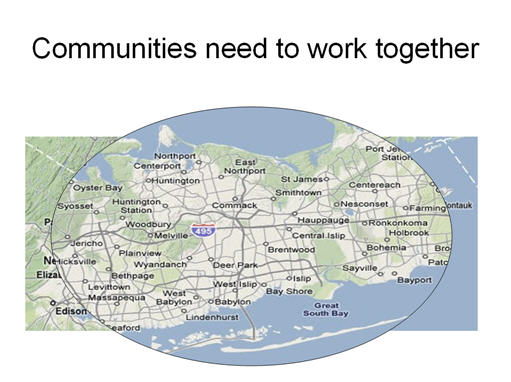
Click OK or Close to exit from any dialog boxes. The oval now contains the cropped image. If necessary, move and resize it so that the two images appear seamless and appear as one image with an oval over part of it.

With the filled oval selected, choose Slide Show> Custom Animation. (In 2007: go to Animations tab> Animations group> Custom Animation.)
Choose Add Effect> Emphasis> Grow/Shrink. You'll probably want to control the timing, so leave the Start to On Click. For the size, adjust as needed. Remember that you can click this item, and enter any value in the Custom text box. I used 200% to double the size of the image. Set the Speed as desired; I used the Fast setting.
Go into Slide Show view and click to watch the oval enlarge the image.
Watch the result (created with TechSmith Camtasia):

Use Zoom Animation on an enlarged image
To avoid a somewhat blurry image, you can start with the enlarged image. Follow these steps:
Insert your main image.
Insert an Oval from the Draw toolbar, dragging it to cover the area that you want to enlarge. (In 2007, insert it from the Home tab> Drawing group, Shapes.) Resize and move it as desired.
With the oval selected, choose Slide Show> Custom Animation. (In 2007: go to Animations tab> Animations group> Custom Animation.) Choose Add Effect> Exit> Disappear. The Start should be On Click if you want control over the timing. Instead, you can use With Previous to make it automatic.
Obtain another image that is enlarged the way you want it and insert it on top of the original image and the oval.
Display the Picture toolbar (right-click any toolbar and choose Picture). Choose the Crop button. (In 2007, click the Picture Tools Format tab and click the Crop button.) Crop the picture to the area that you want to show enlarged.
Right-click the picture and choose Save as Picture.
Insert another Oval from the Draw toolbar, dragging it to cover the area of the enlarged image that you want to display. (In 2007, insert it from the Home tab> Drawing group, Shapes.) Resize and move it as desired.
Delete the cropped picture; you don't need it on the slide any more.
Right-click the large oval and choose Format AutoShape (in 2007: Format Shape). On the Colors and Lines tab, click the Fill Color drop-down list and choose Fill Effects, then click the Picture tab. Click Select Picture and choose the larger image you saved. Click Insert. (In 2007, in the Fill category, choose Picture or Texture Fill. Click the File button, choose the image you saved, and click Insert.)
Click OK or Close to exit from any dialog boxes. The larger oval now contains the enlarged image. If necessary, move it so that it's centered over the smaller oval.
With the larger, filled oval selected, from the Custom Animation task pane, choose Add Effect> Entrance Zoom. The Start should be With Previous so that the animation starts as soon as the smaller oval disappears. I set the Speed to Fast.
Go into Slide Show view and click. The small oval disappears as the larger oval zooms in filled with the enlarged image.
Watch the animation:
Read more: http://www.ellenfinkelstein.com/powerpointtips/powerpoint_tip_magnify_image.html#ixzz0rYZBm8oE
No comments:
Post a Comment